Biomechanics & Rider Fitness

BIOMECHANICS & RIDER FITNESS

Equine Biomechanics


Biomechanics is the science of movement of a living body, including muscles, bones, tendons and ligaments work together to produce movement. Biomechanics explains the negative impact upon a horse’s body caused by incorrect riding and or training methods.

Rider Biomechanics


Rider biomechanics is the study of the workings and organization necessary in a rider’s body, so that they can stabilize themselves against the horse’s greater force of movement. Influencing and working together to produce harmony, rather than two separate systems working independently of each other in opposition.

Applying the biomechanics of both the horse and the rider can help to create unity, ease of movement, prevent lameness and help to achieve their best potential possible without over stressing bones, joints, tendons and ligaments. Every horse and rider combination is very different and care must be taken when setting up exercises and training programs for all involved. Seek out professional help from qualified health practitioners to assist you in understanding and implementing biomechanics. The teaching of biomechanics is not to criticize a horse or rider but to access freedom or impediment of movement, and to give appropriate skills for both horse and rider to create better appropriate unity of movement.

Books:
Centered Riding by Sally Swift
Activate Your Horses Core by Narelle C. Stubbs & Hilary M. Clayton
The Horses Muscles in Motion by Sara Wyche
55 Corrective Exercises for Horses by JEC Aristotle Ballou
Biomechanics and Physical Training of the Horse by Jean-Marie Denoix
Horses Movement by Gial Williams & Alexa McKenna

Rider Fitness Competency Testing


Summary
The rider fitness competency testing consists of a series of functional baseline competency fitness tests that will help to show balance, body symmetry, range of motion and coordination for the equestrian athlete. These tests and exercises will give a simple guideline for the rider to understand their body’s strengths and weaknesses, and will help to define target areas that may need improvement.
Warm Up
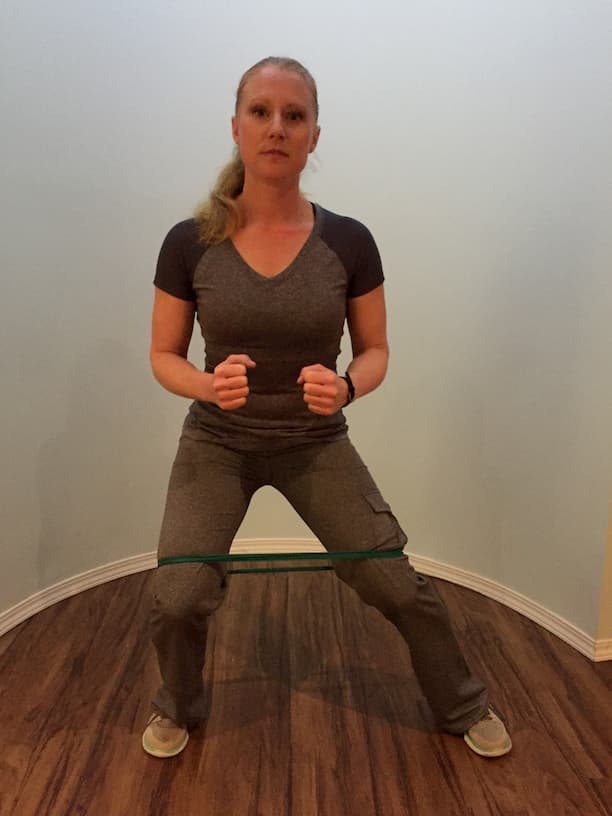
Lateral Band Walk:
  • Put a resistance band above and around both knees.
  • Semi-squat in riding position & side step, alternating steps from the left to the right.
  • 30 Seconds/8 Second rest X 10 repetitions.
  • Challenge by putting the resistance band around your ankles.

Tests/Exercises

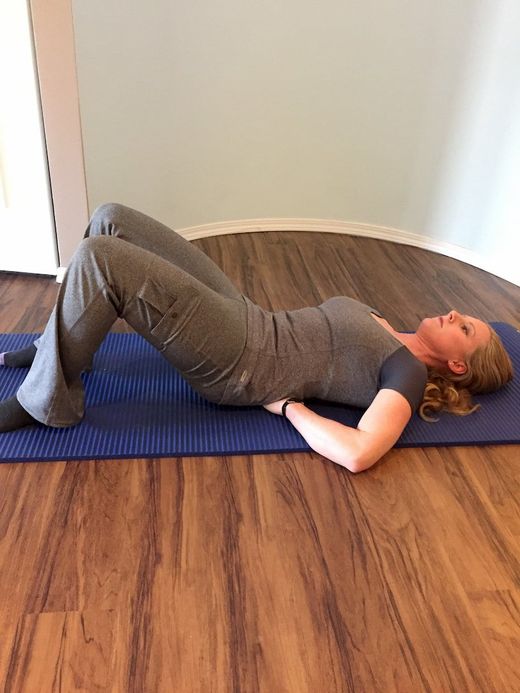
Pelvic Tilt:
  • Lie on the floor, face upward with knees bent.
  • Squeeze your abdominal muscles (stomach), so that your back is flat against the floor.
  • Bend your pelvis slightly upward and hold this position
  • Hold position for 10 Seconds/5 second rest X 10 Repetitions 
  • If is hard to hold your back flat against the floor while pelvic tilting, or you have a pronounced arched or hollow back, you may have an anterior pelvic tilt. This is common in riders and can be caused by a shortening of the hip flexors, lengthening of the hip extensors and weak abdominal muscles. This is when the front of your pelvis rotates forward, and the back of your pelvis rises. Sitting for long periods, poor posture, and weak core muscles can be the biggest contributing factors in causing anterior pelvic tilting and lower back pain.
***If you have trouble keeping your back against the floor while pelvic tilting then you will need to build more core muscles and flexibility in your lower back, hips and pelvis.
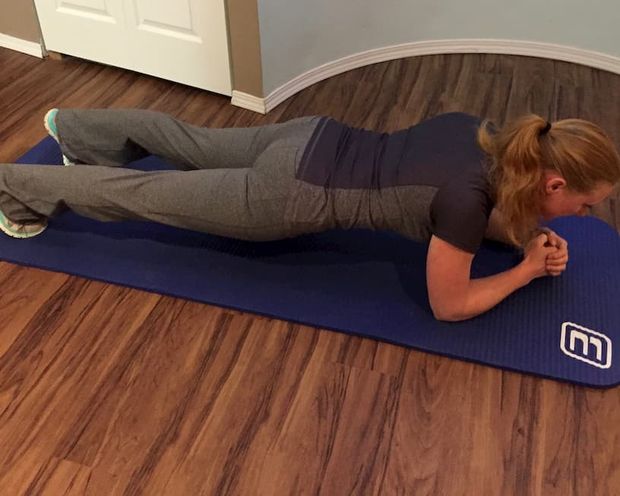
Plank Set (from forearms):
The plank exercise helps to develop strong core and activates so many muscles in the body. A strong core is the centerpiece of efficient and powerful movements. The objective is learning to brace the core for dynamic stability, keeping the spine stationary and resisting motion.
  • Position your body over your forearms and knees (like in a push up off the knees) with your elbows placed under your shoulders.
  • Cue scapular retraction (shoulder blades together), abdominal bracing, gluteal activation, followed by knee extension (legs approximately shoulder width apart).
  • Keep hips level and bum not to high or to low but in a perfect line.  
  • Hold for 10 Seconds/5 Second Rest/ 10 Repetitions
***A strong rider should be able to appropriately hold the plank position for all repetitions without dropping their hips or one side of their hips, having bum too high or low, shoulders rounded or excessive shaking.
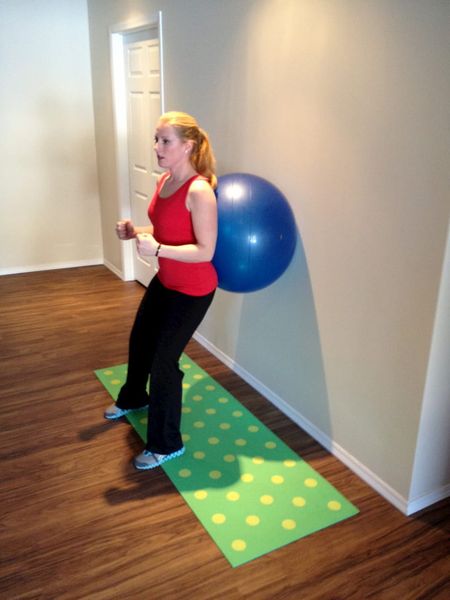
Wall Ball Squats:
Squats strengthen the buttock muscles, hamstrings, and other leg muscles that are needed when riding.
  • With ball on the wall, position the small of your back on the ball.
  • Pull shoulder blades down and back, lean your back into the ball as you shift your weight to your heels.
  • Push down wards into a squat or where your knees are at a 45degree angle (like you were sitting in a chair), making sure your knees are not in front of your ankles.
  • Push upwards back into standing position as the ball now rolls downward.
***Test how many proper ball squats can be done in 1 Minute. 30-40 squats in 1 Minute will show a strong rider.
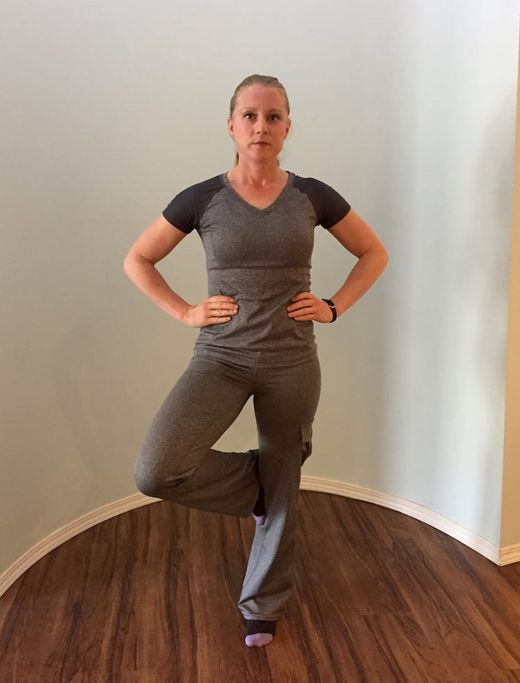
Stork Stance:
The stork balance stand test assesses overall balance
  • Stand comfortably with eyes open, hands placed on your hips.
  • Without assistance, raise one leg and rest your foot on the opposite knee or raise your knee straight up to hip level.  
  • Hold this stance for as long as you can with out taking your hands off your hips or touching your foot to the ground. Time how long you can stand.
  • Switch legs and re time.
  • Test each leg three times and average the time.
  • Testing stops when your hands leave your hips, the opposite foot is used for balance or the foot is placed on the ground.
***Mean scores (by Age):
  • 18-39=43 Seconds
  • 40-49=40 Seconds
  • 50-59=37 Seconds
  • 60-69=27 Seconds
  • 70-79=15 Seconds
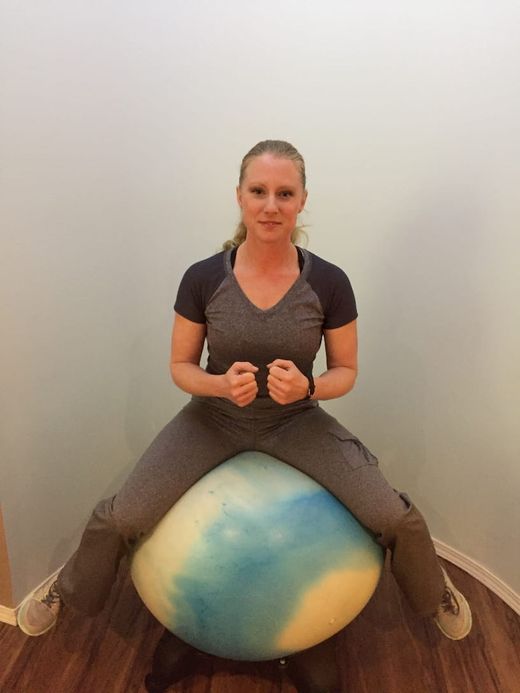
Sitting on the Ball in Riding Position (feet off floor):
This exercise tests what the riders ability is for balance as if they were on a horse. You can use a very large ball, a ball on a ball stand or a ball with a saddle on it resting on a ball stand.
  • Sit on the ball with your pelvic bones sitting on the middle of the ball with arms and hands in riding position.
  • Lift both feet off of the ground and stay balanced on the ball as evenly as possible.
***Time how long you can balance on the ball without letting your feet touch the ground. A strong rider can balance at ease and with their hips and body even for over 1 Minute. To make the test harder put a blindfold on.
Wobble Board (plastic, rubber, or wooded):
This exercise tests what the riders ability is for balance as if they were on a horse. You can use a very large ball, a ball on a ball stand or a ball with a saddle on it resting on a ball stand.
  • Tests core stability and ability to balance forwards, backwards and side to side.  
  • Stand on the wobble board with feet approximately shoulder width apart.
***Simply stand on the wobble board for 1 minute. You should be able to hold the position without moving the board or stepping a foot off for 1 Minute.
***Stand on the wobble board and to rock the board from side to side then front to back (the board slightly tapping the ground each time you rock it) for 2 Minutes. You should be able to maintain these rocking movement fluidly without stepping off the board.

Please use your discretion when doing these exercises/tests, and they should not take the place of a Doctors or Sports Therapist recommendations. 


These tests were formulated by Rachelle Reichert, owner of Stride High Stables (3X Bronze Medalist, World Cup Saddle Seat Equitation Canadian Team Rider) and Dr. Charles Vantanajal, owner of In Balance Family Chiropractic & Wellness Centre (BSc., D.C. ART, GRASTON,TRX,TPI Certified 3).

Lunge–Line Exercises


Importance of Lunge Line Exercises
Riding on a lunge line is to create a situation where an instructor or person is on the ground holding a lunge line that is connected to a halter or bridle of a horse. The rider is riding the horse with our without a saddle and the rider is to not use a bridle or reins. It is great to use a horse that is conditioned to not be fearful of the rider’s arms moving in all directions and has fairly good rhythm in all gaits.

Every rider wants to improve their position and balance on a horse regardless of what discipline they ride in. Instructors agree that a good independent seat is essential to becoming a good rider. A good riding position comes from an effective seat. Once you discover the true harmony that an effective seat can produce, you may agree that the seat can truly be distinguished as the core of all riding. Lunge line exercises, with our without a saddle and no use of the bridle will greatly improve rider stability, strength and balance for the rider. Lunge line exercises develop core strength in a rider, which enables the body to maintain balance. Smith Lilly quotes from his book Saddle Seat Horsemanship “Balance on a horse means the rider can follow the horse’s movements in such a way that the horse’s own balance is not disturbed, with the highly skilled rider able to improve and enhance the horse’s balance. Such a rider is said to have an independent seat. The moment the rider begins to use the hands or lower legs for balance or stability in the saddle, the independence of the seat is lost and the quality of the riding is diminished. As a practical matter, a horse’s maneuverability in the show ring is dependent upon the rider’s ability to keep the horse in balance while making a turn.”

During all lunge line exercises, the rider needs to demonstrate the correct riding alignment by establishing a straight line down from the ear to the shoulder, hip and heel. While maintaining this alignment the rider needs to stay relaxed and supple and to keep their ribs up and shoulders back and loose.

Leg Position
  • At a walk on the lunge the rider can practice getting their leg into the perfect riding position by grabbing the pommel with both hands and pushing their knees downward and around the horse with heels down. Practice at all gaits with and without stirrups.
  • A more difficult version of this exercise is to do the same thing but in two point. When you feel your knee come down while in two point, this is the spot that you should ride at remembering to keep your ribs up and chest out.
Arm Position
  • Many riders have tense arms, hands and shoulders. A good starting stretch is, while riding at a walk, the rider can take their hand and touch the opposite toe and repeat a few tips with each hand.
  • At all gaits the rider can practice doing windmills by swinging their arms in circles both forward and backwards. They can do both arms at once or on at a time or the opposite arm forward while the other one circles backward. They can also look from side to side.
  • The rider can hold their arms straight out in front of them stretching as far as they can. This should be practiced at all gaits and especially in two-point position.
Balance
  • The rider can ride all gaits in two point position with their arms straight out from the sides of their body.
  • Another exercise is to put both hands behind their backs or behind their heads and twist their body from side to side.
  • Using no stirrups at all gaits and two- point position will build balance as well as dropping and picking up one or both stirrups.
  • At a posting trot the rider can practice changing diagonals on both the up or down beat at certain intervals.
  • Laying out trotting poles on the ground helps to make the horses rhythm less predictable, which in turn makes the rider more in tune with their balance, no matter what the horse does.  
These exercises can be practiced at all gaits and at two-point as well as during all upward or downward transitions depending on the level of the rider. To make it more challenging the rider can drop their stirrups or ride bare back or use a bare back pad. Lunge line exercises should be done approximately once a week to really see improvement. An even more challenging experience with the proper education of both rider and horse is riding bareback and bitless at liberty!!
  
For more information check out these sites, books, and DVD’s:
  • Saddle Seat Horsemanship DVD, Saddle Seat Riding Skills by Smith Lilly (this DVD goes in depth about lunge line exercises as well as a segment on showing a 3-Gaited and 5-Gaited horse, a must have at approximately $30 ordered from World Champion Horse Equipment or The Saddlebred Horse Museum)
  • Saddle Seat Horsemanship Book by Smith Lilly
  • Saddle Seat Equitation by Helen Crabtree
  • Riding for Success by Gayle Lampe
  • Centered Riding by Sally Swift
  • The Horse America Made by Louis Taylor
  • www.saddleseatcanada.com
  • www.regaljada.tripod.com/saddleseatequitation (this site has great show tips, makeup, dress and pattern tips)
For Liberty Training:
  • Linda Tellington-Jones
    • The Ultimate Horse Behavior and Training Book
    • www.ttouch.com (under TTeam or Liberty training)
  • www.parelli.com
  • www.carolresnickblog.com
Share by: